Monday, January 7, 2013

Computer Armoire turned AWESOME TV Stand

I am kind of geeked about this post. I randomly came up with the idea to somehow re purpose the armoire that had been sitting in my living room serving NO purpose (it somehow became my catch-all and was full of junk). I even tried to sell it a couple months ago, but had no luck. 


Inside.....
 
 
So, what to do with the old girl? Oh and by the way, I picked this up from an Ad on Craigslist about 3 years ago for $40. You certainly didn't think I paid full price for her, did you? :)

While contemplating my new use for this Armoire, I had to keep something in mind. It's not real wood. It's all laminate, which is a pain in the rear to paint.

OK. So, I decided I was going to somehow turn it into a new TV stand. It would need some tweaking of the shelves on the inside since it's designed for a computer, but it could work!
 
Here we go.....
 
I recently learned that Home Depot has EVERY Benjamin Moore paint code in their computers and although they don't sell BM paint, you CAN get the BM color in a Glidden or Behr paint. Ummmm.....AWESOME!
 
I chose Antique Pewter and got it in a Glidden sample of Eggshell. Since the sample clearly isn't enough to paint an entire armoire (which would likely take several coats), I had to get creative. I am ALWAYS looking to do things the cheapest way possible. I obviously could have bought a larger can of paint, but that's silly.

I had half a can of an Antique White from another project, so I mixed half of my BM sample in with a very large amount of the white. This obviously lightened my paint color substantially, but I was cool with that. I actually really liked the end result of the color.
 
 
After 2 coats of paint, it was ready to be sanded. I was going for a very very distressed look for the ol' girl.
 
 
Getting there. A lot of elbow grease folks. A lot.
 
After a lot of sanding and spending a great deal of time (with the help of my trusty assistant, my Sister!) getting the TV, DVD player, Cable box, etc. switched over - we were DONE! I also learned that I was never meant to be any kind of electrician or cable installer. I am a wire moron.
 
 
Beautiful, isn't she?
 
 
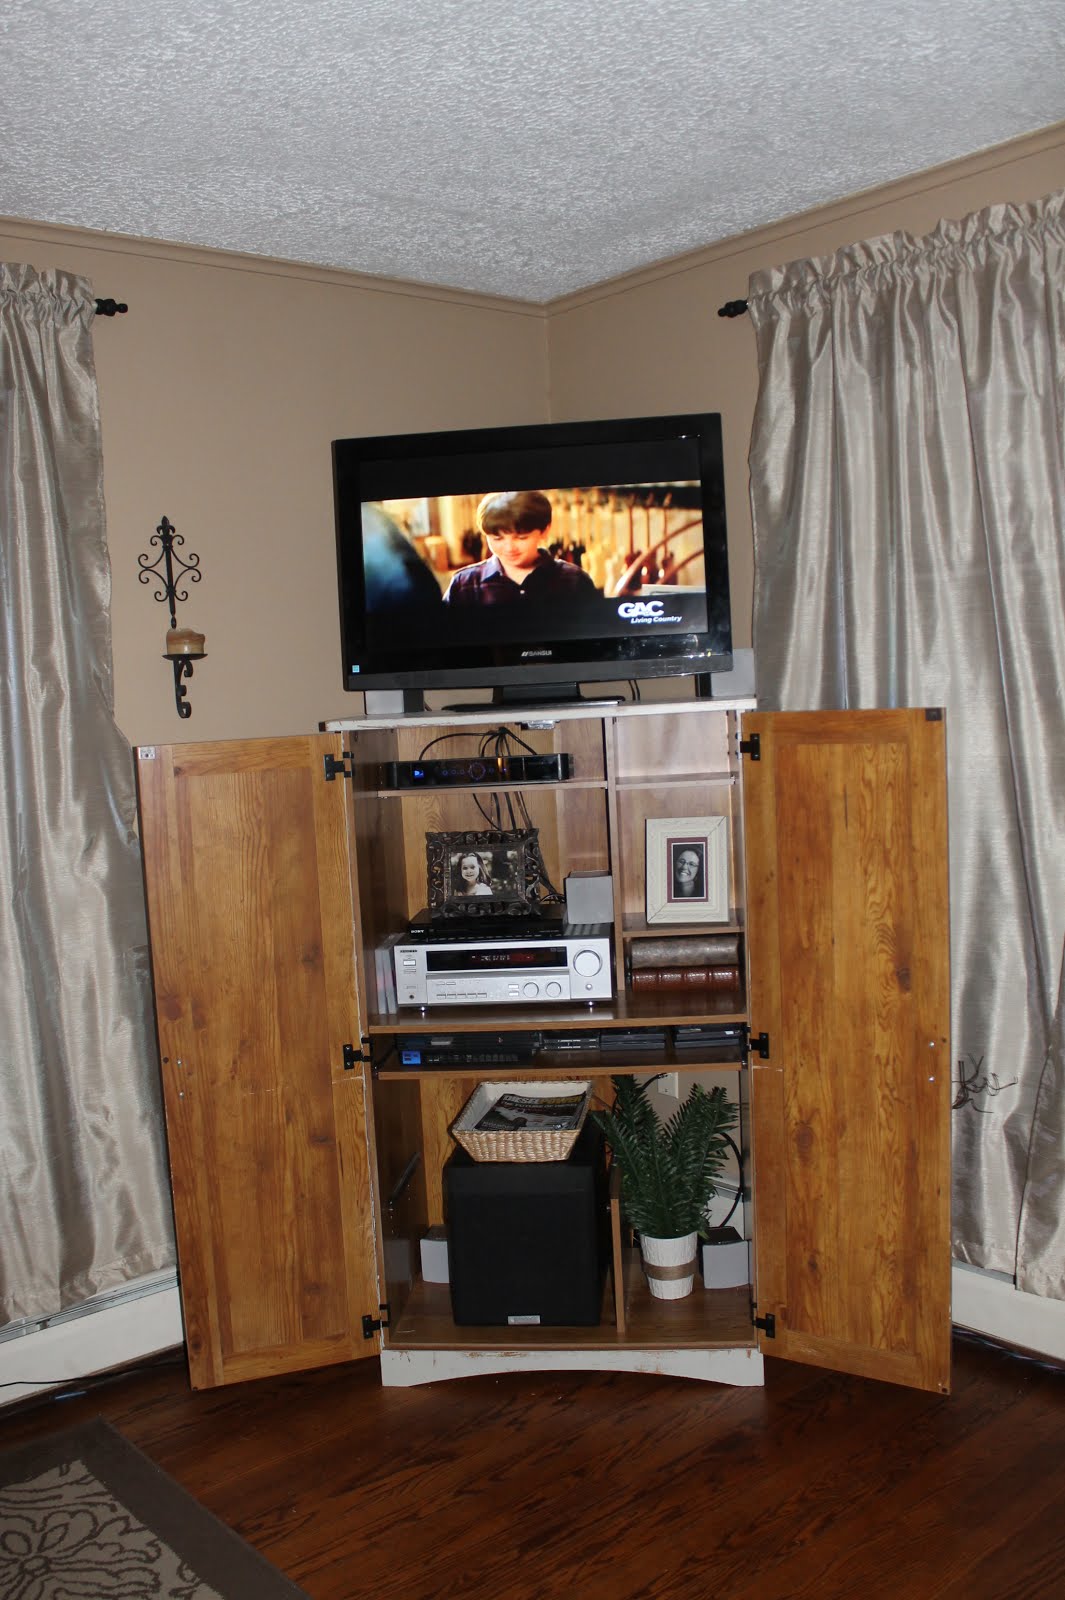
I opted not to paint the inside for two reasons. 1. That would take up WAY too much time.   2. I wanted the look of the wood on the inside. 
It worked out!  
I love having the option to close the doors on it when people come over!


Oh, I just love it!
 
Moral of today's post: Don't get rid of your old furniture!! Re purpose it DIY style!!
 
The final breakdown for this project was only $2.94 (sample paint). I already had everything needed to create this gem!

Saturday, January 5, 2013

Super SIMPLE Furniture Rehab

OK. This post isn't really that exciting. I'm really hoping that if you're one of those timid "I'm afraid to DIY anything" types that this will kick those fears aside. This is a beyond simple transformation.

My kids have had this little table for a few years. I picked it up at a yard sale for around $5. We've always used it in their play room for crafts, they would eat lunch on it, etc. Good times. I recently rehabbed their play room and there wasn't any room for this table anymore. Honestly, I didn't even try to make room for it. It's pretty worn and ugly.


So, I threw it in the basement and it sat there......for months. I don't know why I didn't bother doing something with it sooner, I just didn't.

Here's all you need to do a simple rehab on an old ugly piece of furniture like this.

A can of Minwax stain in your color of choice. I used Walnut for this particular beauty.


Some paint. I grabbed a sample of Black at Home Depot. Simple enough.


Then I used some sand paper and sanded down just the top of the table. Since I was staining it, I just needed a smooth finish on it. No need to sand down to the bare bones. I didn't touch the legs of the table.

After sanding the top, I added my stain with an old sock. I grabbed a clean sock and wiped off the stain that I had just applied. The wood can only absorb so much at a time, so it's important to apply the stain with one "sock" and then wipe it back off with another "sock". I waited for the stain to dry completely (a few hours) and I repeated this step. It wasn't as dark as I wanted it with just the one coat.

Then I painted the legs of the table with my black paint. I used a medium sized paint brush and didn't bother making it neat. I planned on distressing the tar out of the legs so I knew it wouldn't matter if the paint looked nice. One of the many reasons I love distressing.

Once the legs were dry, I sanded them down with a sanding block to really rough them up! That's it!


Easy as pie! Now, this old dilapidated table that used to be in our play room is a super cool distressed end table in the living room!

Cost breakdown for this DIY:
$2.94 Paint Sample


I had everything else on hand.

Wednesday, January 2, 2013

Kitchen Remodel For Less Than $300

We bought our home two years ago and although the house itself was in pristine condition, it needed some serious face lifting. Our house was built in 1918, so it doesn't lack charm and unique character. I was in love with my house the minute I stepped foot inside the front door - I knew without a doubt that we would live here. However, I hated the kitchen. It was drab and dark and dated.
 
The second we closed on the house and got the keys, we were in the kitchen giving it some much needed help. We had a budget of around $100 for the kitchen when we initially purchased the house, so not much to work with.
 
Here's the kitchen the day we bought the house. I want to smack the person who thought the multi-colored tile was a good idea.
 
I wanted to replace the back splash but because of our obnoxiously low budget, I couldn't. So, I used two coats of Gripper primer, then I put on two coats of an antique white. If you have a small budget, painting tile is super affordable and still gives you a great look.  


After the paint on the tile. :)
 
Typically in an old house you will have plaster walls - and our house is no exception. The wallpaper on the plaster was NOT coming off. We had planned on removing the wall paper and painting the wall. However, we had to improvise when the wallpaper wouldn't budge. I found a textured paint-able wallpaper at Home Depot that was very affordable. This would help hide the bumps in the OLD wallpaper that wouldn't come down, AND give us the painted look we wanted. Win win!


I wish I had a better picture of the 'after' for the wallpaper, but our camera sucked back then. This was the finished product after the painted tile and the updated wallpaper.
 
A year or so later, we decided that the kitchen was still too dark and drab. I decided to paint the cabinets. This is by far the BEST and cheapest way to update your kitchen. Our cabinets are in great condition and very much fit the house, but for such a small space, they were too dark.
 
See? Too dark.
 
Start off by labeling ALL of your cabinets so you don't have to guess where they go when it's time to put them back on.
 
Remove all the cabinets and sand them down. You don't have to sand them down to the bones, just get the top layer of stain off to give them a smooth finish.
 
Then paint. My cabinets took 3 coats of paint each, but the paint dries so quickly, by the time I painted the last cabinet the first one was dry so I started over. It was just a constant run of painting for 10 hours. Exciting!
 
I used a Semi-Gloss so that they'll clean easily. I probably could have gotten away with less coats of paint had I used an eggshell, but since I was going with white I needed them to be easy to wipe clean.
 
Mid-project we decided to do away with this entire section of cabinets to open up the room. Best decision ever. I lost a lot of storage, but my kitchen is so airy and open now! Worth the sacrifice for sure!
 

And....the end!
 
So, to recap.
-We spent about $100 when we first moved on the back splash and wallpaper.
-We added crown molding for about $40
-New sink faucet (also the best upgrade!!!!!) $99
-Painted cabinets $18 (1 can of paint)
We were able to get away with using the same hardware!
**Total $257 for what looks like an entirely new kitchen!!**
 
Work with what you have!! You don't need to spend $20,000 on a Kitchen remodel - I mean, unless you really want to.
Get creative and be willing to work a little and you can totally transform your kitchen!


Hope this helps anyone looking to do a remodel on a BUDGET!
 
I'll post our bathroom remodel soon!!! We totally transformed our bathroom for next to NOTHING!